Assembly instructions for futons are essential for proper setup. Detailed PDF guides outline tools, parts, and steps. Follow carefully for safety, ensuring weight limits and secure connections. Always check hardware and frames before starting. Proper assembly ensures durability and comfort, transforming your space efficiently. Start by reviewing the manual thoroughly.
Overview of Futon Assembly Process
Assembling a futon involves a systematic process that requires attention to detail and adherence to instructions. The process typically begins with unboxing and inventorying all components, ensuring no parts are missing. Next, the frame is constructed by attaching legs, arms, and stretchers using bolts and screws. The deck and rollers are then secured to the frame, followed by the backrest and seat. Converting the futon into a bed involves sliding the seat and back deck into position and locking the frame. Regular maintenance, such as tightening bolts, is essential for stability and longevity. Following the instructions step-by-step ensures a safe and functional assembly.
Importance of Following Instructions
Following the assembly instructions for a futon is crucial for ensuring structural integrity and safety. Misaligned parts or incorrect bolt tightening can lead to instability, potentially causing the frame to collapse under weight. Proper assembly not only guarantees durability but also prevents damage to the product. Additionally, adhering to the instructions helps maintain the product’s warranty and ensures compliance with weight capacity guidelines. Taking shortcuts or skipping steps can result in a poorly assembled futon, which may fail to function as intended. By carefully following the provided instructions, users can achieve a secure and comfortable setup for both seating and sleeping purposes.
Tools and Materials Required
Assembling a futon typically requires specific tools and materials to ensure a smooth process. Essential tools include an Allen wrench, screwdriver, and hex wrench, often provided in the hardware kit. Additional items like a rubber mallet, measuring tape, and clamps may be useful for tight connections and alignment. Materials such as bolts, screws, and dowels are usually included in the package. It’s important to gather all components beforehand and organize them by size and type. Protecting the workspace with cardboard or a soft cloth can prevent damage to the floor or frame. Ensure all tools are within reach to avoid delays during assembly.

Understanding the Components
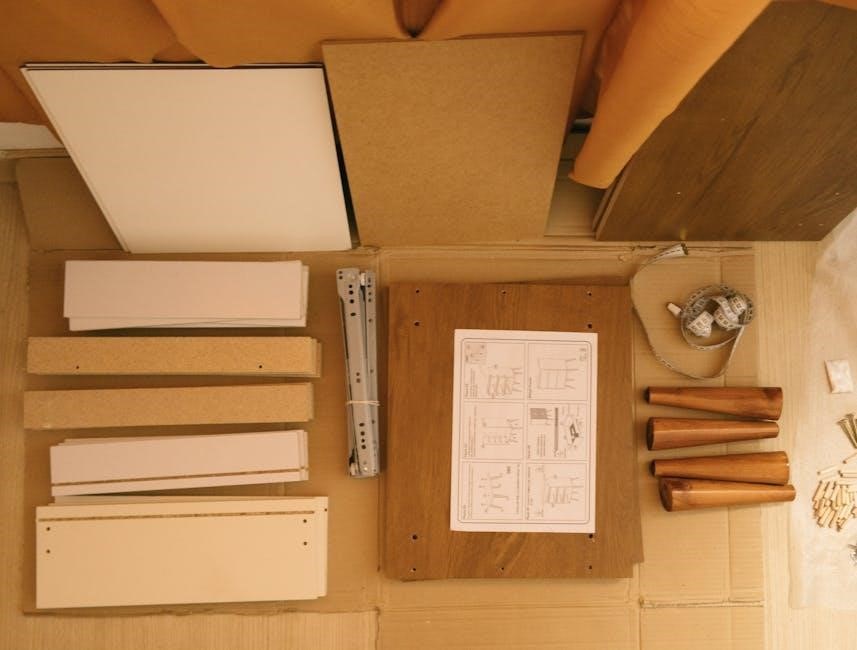
Futon assembly involves identifying and organizing frame parts, hardware, and accessories. Key components include the seat deck, backrest, rollers, and support legs. Ensure all parts are accounted for before starting assembly. Proper identification helps in following instructions accurately and avoids delays. Familiarize yourself with each piece to understand its role in the structure. This step is crucial for a successful and safe assembly process. Always cross-reference parts with the provided checklist to confirm completeness and compatibility.
Futon Frame Parts Identification
Identifying futon frame parts is crucial for assembly. Key components include the seat deck, backrest, rollers, and support legs. The seat deck is the base, while the backrest folds. Rollers enable smooth conversion between sofa and bed modes. Support legs provide stability and height. Additional parts may include armrests, stretchers, and clevis pins. Hardware such as bolts, screws, and Allen keys is essential for securing components. Refer to the provided checklist to ensure all parts are included. Proper identification prevents confusion and ensures correct assembly. Familiarize yourself with each piece’s purpose before starting. This step ensures a smooth and error-free assembly process. Always cross-reference with the manual for specific details.
Hardware and Accessories Checklist
A comprehensive hardware and accessories checklist ensures smooth assembly. Essential items include bolts, screws, Allen keys, and hex wrenches. Additional components may feature clevis pins, dowels, and support brackets. Accessories like Allen keys and wrenches are often provided. Count and organize all parts before starting. Verify the presence of shorter bolts for securing decks and longer ones for frame connections. Ensure all hardware matches the manual’s specifications. Missing or incorrect parts can delay assembly. Double-check the checklist to confirm everything is included. Proper preparation prevents unnecessary interruptions. Organize hardware by size and type for easy access during assembly. This step ensures efficiency and reduces potential frustrations.
Weight Capacity and Safety Guidelines
Adhering to weight capacity and safety guidelines is crucial for safe futon use. Most futons have a maximum weight capacity, typically ranging from 400 to 600 pounds, depending on the model. Exceeding this limit can compromise structural integrity and safety. Always check the manufacturer’s specifications to ensure compliance. Regularly inspect and tighten bolts and screws to maintain stability. Place the futon on a sturdy, even surface to prevent tipping. Avoid overloading with excessive weight or improper use. Follow assembly instructions carefully to ensure all parts are securely fastened. Proper maintenance and adherence to guidelines ensure longevity and safe functionality of your futon.

Step-by-Step Assembly Guide
Prepare workspace, attach frame parts, align rollers, secure connections, and test functionality. Follow instructions for proper assembly, ensuring stability and smooth conversion between sofa and bed modes.
Preparing the Workspace
Begin by clearing a flat, stable workspace. Cover the floor with cardboard, paper, or carpet to protect both the surface and the futon parts. Ensure the area is free from clutter. Lay out all components and hardware, organizing them for easy access. Refer to the PDF instructions for a detailed checklist. Use a marker or screwdriver to mark alignment points if needed. Gather all tools, such as Allen keys and wrenches, provided or recommended. Double-check that all parts are included and undamaged. This preparation ensures a smooth, efficient assembly process, minimizing errors and saving time. Safety and organization are key to success.
Assembling the Frame

Start by attaching the front and back stretchers to the arms using long bolts. Tighten securely with the provided Allen key. Next, connect the seat and back decks to the frame, ensuring proper alignment. Insert leg posts into the designated holes and hand tighten. Attach the rollers to the back and seat decks for smooth conversion. Use short bolts to secure the backrest to the deck. Tighten all connections firmly to ensure stability. Refer to the PDF guide for specific diagrams and torque specifications. Double-check all joints to avoid loose parts. A sturdy frame is crucial for safety and functionality, so take time to ensure accuracy.
Attaching the Deck and Rollers
Align the seat deck with the frame, ensuring the pre-drilled holes match. Secure using short bolts, tightening firmly with the hex wrench. Attach the back deck similarly, ensuring it is longer than the seat. Next, install the rollers on both decks, fitting them into the roller slots. Tighten the roller bolts to prevent movement. Use the provided clevis pins to lock the decks in place. Make sure the rollers are evenly spaced for smooth conversion. Refer to the PDF guide for specific alignment marks. Properly securing the decks and rollers ensures the futon converts seamlessly between sofa and bed positions, providing durability and ease of use.
Securing the Backrest and Seat
Attach the backrest to the frame using the provided bolts, ensuring proper alignment. Insert clevis pins into the hinge brackets, securing them with cotter pins. Place the seat deck onto the frame, aligning the pre-drilled holes. Use the shorter bolts to fasten the seat, tightening firmly with the hex wrench. Ensure the backrest and seat are level and evenly spaced. Double-check all connections for stability. Tighten any loose bolts to prevent movement. Once secured, test the backrest and seat by gently rocking them to confirm stability. Properly securing these components ensures the futon operates smoothly and safely, providing both comfort and durability for years to come.

Converting Futon to Bed
Slide the seat and back deck forward as indicated by arrows. Lock the frame securely in position to ensure stability. Adjust the futon to your desired bed position, ensuring all mechanisms click into place firmly. Test the bed by laying on it to confirm proper conversion and stability. This process ensures a smooth transition from sofa to bed, providing a comfortable sleeping surface. Always follow the manufacturer’s guidelines for safe and correct conversion.
Sliding the Seat and Back Deck
To convert your futon into a bed, start by sliding the seat and back deck forward. Locate the release mechanisms, typically found underneath or on the sides, and disengage them to allow smooth movement. Gently push the seat deck forward while lifting the backrest slightly to align it with the seat. Ensure the decks slide evenly and stop at the desired position. Use the locking pins or clips provided to secure the frame in place. Check that all parts are aligned and stable before use. Proper alignment ensures the futon lies flat and supports the mattress evenly. Always verify the weight capacity to avoid overloading the frame.
Locking the Frame in Position
Once the futon is fully extended, ensure the frame is securely locked. Locate the locking mechanisms, such as pins, clips, or levers, and engage them firmly. For most models, inserting clevis pins into designated holes or flipping metal clips downward will secure the frame. Always check that the locks click into place and hold the structure stable. Double-check the alignment and make sure no parts are loose. For added safety, verify that the weight capacity is not exceeded. Properly locking the frame ensures the futon remains sturdy and prevents accidental collapse. Refer to the assembly manual for specific locking instructions tailored to your model.
Adjusting the Futon Positions
Adjusting the futon positions ensures comfort and versatility. Start by releasing the locking mechanisms, such as pins or levers, to allow movement. Gently slide the backrest and seat deck into the desired position, using the built-in rollers for smooth transitions. Depending on the model, positions may include upright, reclined, or fully flat. Once in the preferred setting, re-engage the locks to secure the frame. Ensure the futon is level and stable. For models with adjustable armrests, position them to match your comfort needs. Regularly check and tighten bolts to maintain stability. Always refer to the PDF guide for specific adjustment instructions tailored to your futon model.

Maintenance and Care
Regularly tighten bolts and screws to ensure stability. Clean the frame with a soft cloth and mild detergent to avoid damage. Protect the surface from moisture and scratches for lasting durability.
Tightening Bolts and Screws
Regularly inspect and tighten all bolts and screws to maintain the futon’s stability. Use the provided Allen key or wrench for secure tightening. Ensure no parts are loose to prevent wobbling or structural damage. Check weekly, especially after frequent use. Tightening ensures safety and prolongs the lifespan. Avoid overtightening, as it may damage threads. Refer to the PDF guide for specific torque recommendations. This simple maintenance step is crucial for optimal performance and user safety. Keep the futon frame sturdy by making tightening a routine task. Properly secured bolts and screws guarantee durability and comfort for years to come; Always follow the manufacturer’s instructions for best results.
Cleaning and Protecting the Frame
Regular cleaning and protection are vital to maintain the futon frame’s appearance and durability. Use a soft cloth and mild detergent to wipe down surfaces, avoiding harsh chemicals. For wooden frames, apply furniture wax to protect the finish. Metal frames can be cleaned with a damp cloth and dried thoroughly to prevent rust. Cover the frame with a protective cover when not in use to shield it from dust and moisture. Avoid exposing the frame to direct sunlight or extreme temperatures. Periodic polishing enhances the frame’s luster and ensures longevity. Follow the PDF guide for specific care instructions tailored to your frame material. Proper maintenance keeps your futon looking new and ensures lasting performance.

Troubleshooting Common Issues
Regular cleaning and protection are crucial for maintaining your futon frame’s durability and appearance. For wooden frames, use a soft cloth with mild detergent to wipe down surfaces, avoiding harsh chemicals. Apply furniture wax periodically to protect the finish. Metal frames can be cleaned with a damp cloth and dried thoroughly to prevent rust. Cover the frame with a protective cover when not in use to shield it from dust and moisture. Avoid exposing the frame to direct sunlight or extreme temperatures, as this can cause fading or warping. Regular polishing enhances the frame’s luster and ensures longevity. Follow the PDF guide for specific care instructions tailored to your frame material. Proper maintenance keeps your futon looking new and ensures lasting performance and comfort.
Identifying Missing Parts
Before starting assembly, ensure all components are present by cross-referencing the futon assembly instructions PDF. Check for hardware bags, bolts, screws, and dowels. Missing parts like seat decks, backrests, or rollers can halt progress. Refer to the parts checklist in the PDF to verify each item. If any components are missing or damaged, contact customer support immediately. Double-check for small hardware, as these are often overlooked. Proper identification ensures a smooth assembly process and prevents delays. Always follow the PDF guide for accurate part identification and assembly steps to avoid confusion. This step is crucial for a successful and stress-free assembly experience.
Resolving Assembly Challenges
When encountering assembly difficulties, refer to the futon instructions PDF for detailed troubleshooting guides. Common issues include misaligned parts or loose connections. Ensure all bolts and screws are tightened properly, and verify that hardware is correctly matched to each component. If a part doesn’t fit, double-check its orientation and alignment. Consult the PDF for diagrams or assembly tips. For persistent problems, contact customer support or review online resources for additional guidance. Regularly checking the instructions can help resolve challenges efficiently. Proper alignment and secure fastening are key to overcoming assembly obstacles and ensuring stability. Always follow the PDF guide for solutions tailored to your futon model.

Safety and Precautions
Avoid exceeding weight limits to prevent structural damage. Ensure the futon is stable and level during use. Regularly inspect for loose bolts or damaged parts.
Always follow assembly instructions to maintain safety standards and prevent accidents. Secure all components tightly to avoid instability. Adhere to guidelines for optimal performance and durability.

Avoiding Overweight Limits
Ensure the futon’s weight capacity is not exceeded to prevent structural damage. Most futons have a maximum weight limit, typically around 500 Ibs, as specified in the instructions.
Exceeding this limit can lead to instability, frame damage, or collapse. Always check the PDF manual for precise weight restrictions. Avoid placing heavy objects or excessive weight on the futon. Distribute weight evenly to maintain balance and safety. Regularly inspect the frame for signs of strain or wear. Adhering to weight limits ensures durability and prevents potential hazards, making your futon a safe and reliable piece of furniture for years to come.
Ensuring Stability During Use
Ensure the futon is on a level surface to maintain stability. Tighten all bolts and screws regularly, as per the PDF instructions, to prevent wobbling.
Use floor protection like cardboard or carpet to avoid scratching and provide grip. Proper assembly is crucial; follow the manual closely. Check for loose parts and tighten them before use. Avoid overloading the futon beyond its weight capacity. Secure the frame in both sofa and bed positions to prevent accidental movement. Stability ensures safety and comfort, making the futon a reliable piece of furniture for daily use. Regular checks and adjustments are key to maintaining its structural integrity and performance.

Additional Tips and Resources
Customize your futon with optional accessories for enhanced comfort. Download the official assembly instructions PDF for detailed guides and troubleshooting tips. Visit manufacturer websites for support.
Customizing Your Futon
Customizing your futon can enhance its functionality and aesthetic appeal. Consider adding cup holders, storage compartments, or decorative covers. Assembly instructions PDF often include tips for personalizing your furniture; Choose from various upholstery options, such as fabric or leather, to match your home decor. Some models allow for adjustable features, like armrests or headrests, to optimize comfort. Explore additional accessories like coordinating pillows or mattress toppers for a polished look. Refer to the manufacturer’s guide for compatibility and installation details to ensure seamless integration of your custom additions. This way, your futon becomes a unique and functional piece in your living space.
Downloading Assembly Instructions PDF
Downloading the assembly instructions PDF is a crucial step for a smooth futon setup. These guides are typically available on the manufacturer’s website or included in the product packaging. Ensure you download the correct version for your specific futon model, as instructions may vary. Look for PDFs labeled with your futon’s brand or model number, such as “Monterey Futon Frame” or “Coaster Fine Furniture.” Many manuals are available in multiple languages, including English, to cater to a broader audience. Always verify the PDF’s authenticity to avoid incorrect assembly steps. Review the document thoroughly before starting to ensure all parts and tools are accounted for.


Leave a Reply
You must be logged in to post a comment.